REMI / @Home Production
https://support.cyanview.com/docs/Configuration/REMI
Supported products: RCP, RIO WAN, RIO LAN (formerly RIO Live)
Cyanview's remote control features let you control and share cameras from a remote location.
:::note About the name "tag" This page uses "tag" to match the official manual, but from release 26.9.1 onward the screen shows it as "password". :::
Overview
Example: you have a main RCP (cy-rcp-25-165, IP 10.192.25.165) with multiple cameras, and you want to control the main camera (XF605) from another RCP-J (cy-rcp-18-80, IP 10.192.18.80). You export the camera from the main RCP to the RCP-J using REMI (local):
- First, configure the camera
- Set the same REMI tag on both devices
- Import the camera from the main RCP to the RCP-J
The same applies to an RCP importing a camera from a RIO.
Multiple devices can import the same camera from the same device (for example, multiple RCPs importing the same camera from a RIO).
Cloud
Cloud functionality applies only to WAN (supported devices: RCP, RIO WAN).
If you own an RCP or a RIO (WAN), cloud control is included, unlimited, and free of charge. If you have a RIO LAN and want WAN control of your camera, you can purchase a license to upgrade to a full RIO WAN.
Key features:
- Remote camera control over the internet
- Remote access to the Web UI from anywhere
The goal of the cloud is to avoid any firewall setup: all units open outgoing connections, and the cloud acts as a rendezvous server.
If you still need to open ports, use the following:
DNS/port information:
| Item | Value |
|---|---|
| DNS (dynamic) | remi.cyanview.com |
| DNS (Europe) | 1-eu-west-3.remi.cyanview.com |
| DNS (US) | 1-us-west-2.remi.cyanview.com |
| Port | 7887 |
Example configurations
RIO LAN configuration

Typical uses: lens control, Wi-Fi control, USB control, pole cam
Similar to the CI0, but supports all protocols just like the RCP. Up to 2 cameras, no cloud access (LAN control only).
RIO WAN configuration

Typical uses: beauty shots, gimbal/Steadicam
Similar to the CI0, but supports all protocols just like the RCP. Unlimited number of cameras, unlimited cloud access (free).
RCP configuration

Typical uses:
- Controlling the same camera from multiple locations (LAN: e.g. an OB van and a separate desk)
- Controlling different cameras at different venues over the WAN
Configuration steps
Setting up a group
On each device (RCP, RIO WAN, RIO LAN), open the "REMI" tab.

In the right panel, under "Shared Camera Control", enter a tag name in the text box and click "+".

Displayed items:
- Cloud: a green icon means the device is connected to the internet and the Cyanview cloud
- Tags: the list of tags the device belongs to
- Remote GUI: ON by default; allows people to access this device's configuration remotely
This tag functions like a password. Anyone who knows the tag can connect to the group.
A single device can also belong to multiple groups.
Remote device status screen
Once tags are set up on all devices, you can see the status of every device in your groups.
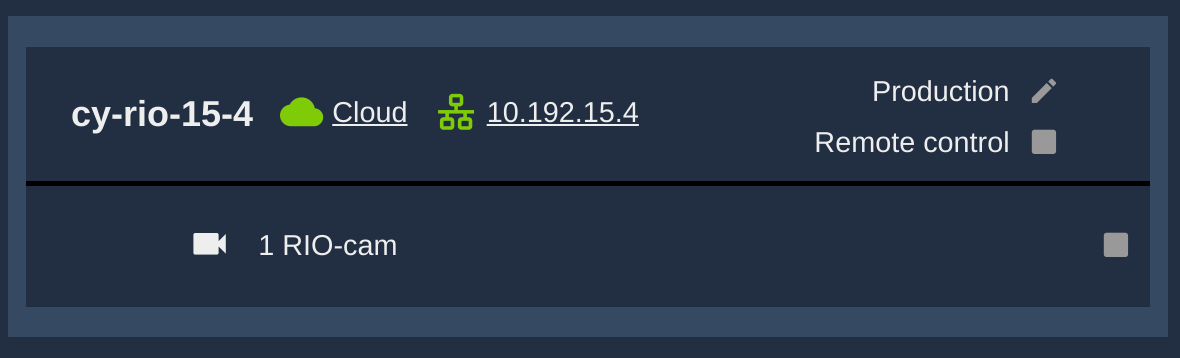
- Cloud icon: the device can be reached through the cloud
- Ethernet icon: the device can be reached over a local link
- Below them, the list of cameras exported by each device
Group names are easy to guess and function as a password. Use a name that is as hard to guess as possible, and do not share it with anyone you don't want to have access.
Navigating to the remote GUI
Once RIOs and RCPs are in the same group, you can access their web pages from anywhere. Clicking the cloud or local IP link (e.g. 10.192.15.4) next to a device name (e.g. cy-rio-15-4) opens that device's configuration in a new page.
Configuring cameras (example: exporting from RIO to RCP)
- Create the camera on the RIO, just as you would on an RCP
- On the RCP, check the checkbox next to the corresponding camera


By default, the camera is imported on the RCP with the same number and name as on the RIO. You can change the following items afterwards, and the link will persist.
RIO side: camera number / camera name / camera manufacturer and model RCP side: camera number / camera name
The same steps apply when exporting from one RCP to another. The configuration is preserved even when switching from LAN to 4G/Wi-Fi.
Advanced settings
REMI mode
Applies mainly to RIO WAN and RIO LAN. By default, RIO WAN and RIO LAN only "export" cameras for remote control. If you want to import a camera on the RIO, change the mode as follows.
Access steps:
- Check the RIO's serial number (e.g.
cy-rio-29-108) - Connect to the RIO's Web UI and check that everything is working (e.g.
http://10.192.29.108) - Add
/dev/app.htmlto the URL (e.g.http://10.192.29.108/dev/app.html) - Search for and click the "Cloud" block
- Edit the "direction" field


Values for the direction field:
| Value | Description |
|---|---|
exporter | Camera export only (RIO default) |
importer | Camera import only |
both | Both import and export (RCP default) |